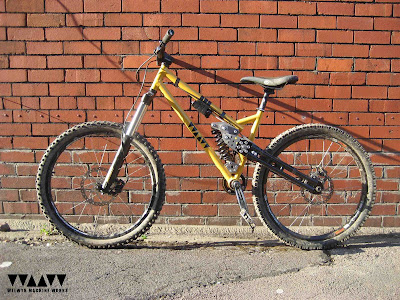
Last week i got to realise a longterm dream, by taking the SBV to the Megavalanche week at Alpe D’Huez in the French Alps, and though I didn't get to race the bike I got a days riding out of it on the top half of the qualifying course and the bottom half of last years Mega course. The frame held up and worked well. I had a blast riding the final parts of the bottom of the Mega course.. grinning ear to ear.. definetly worth all the effort. With the frame layout / suspension design proven it'll soon be on to the mk2. The next frame definetly needs to be alot lighter! and i may go for some gears too, as though i like the singlespeed simplicity pedalling anywhere other than downwards is pretty brutal.
Wednesday, 15 July 2009
Wednesday, 24 June 2009
Thursday, 21 May 2009
Monday, 11 May 2009
To cut a long story short...
As you'll see it’s been quite a while since I last put up a post, and a lot has happened to the project in that time. My grand plans of documenting didn't quite happen, but I did take lots of photos along the way so I might yet write it all up.
Anyways, the frame has been finish (except paint) and the bike built up. Initial rides have been promising, the fundamentals seem to be right, and so far has held up ok. I haven’t ridden many down hill bikes so can't really compare against anything but feels good at speed and the suspension is pretty plush and soaks up the trail well. The single speed gearing is just about right if a little hard on the flatter sections, and other than the profile hub buzzing away it was pretty damn quite on the rough stuff, so its living up to it's name - s.v.b (silent but violent).
This being my first frame means that with every run there’s always that little though at the back of my head of will it / wont it fail? I’d love to have 100% confidence in it, as so far it’s been a blast to ride.
I had left the frame bare to be able to check the welds after each downhill run, but it’s becoming a bit of a pain having to keep it covered in WD40 to prevent it rusting.
As it’s survived the first few rides seemingly ok I'm going to take a chance and give it a simple rattle can paint job in yellow and black (like the image at the start of the blog). The paintwork should reduce maintenance and protect against rusting. Hopefully it'll stay in one piece once pimped up. I’d love to get it out to the Alps this summer for the Megavalanche week at Alpe D’Huez. Watch this space...
Wednesday, 26 November 2008
Reinventing the wheel
Profile Racing disc compatible bmx hub in all it's glory. Mdf wheel jig, bolts adjusted to position rim on centre line of hub.
Black tape on spoke identifies the 'key spoke'
Lacing up as per the instructions
All spokes laced up
Spokes fully tensioned
The finished wheel.. just needs a frame
As shown in the diagrams in the last post one of the main features of the frame design is that it uses a bmx rear hub with its 110mm dropout spacing to reduce the width of the parallel swing arm design, allowing it fit within the crank arms without fouling them while pedaling. When built the rear wheel will be a bit of an oddball.. 26in mtb rim laced to an 110mm bmx hub.
It took a while finding the right hub as I wanted a bmx hub that was disc compatible and they’re bit of a rarity. Finally I found that Chris King and Profile Racing each make one. The CK one is bloody expensive where as the Profile one was just expensive. I went for the Profile hub with a 14mm bolted axel to provide a really solid connection that should stop the sliding dropouts slipping and help stiffen the swing arm laterally. Luckily when I ordered the hub the exchange rate was pretty favorable.. still got done on the import duty though.. damn!
A mate donated a rim to the cause.. cheers Tony. It was used but still true. The local bike shop worked out the spoke length required for the 26in rim / 110mm hub combo.
If you’re thinking on building your own wheels and haven't done so before check out Sheldon Browns guide:
http://www.sheldonbrown.com/wheelbuild.html , its really informative and takes you through not just how the wheel is built, but the why too.
As I didn't have a wheel building jig and I couldn't use the frame to check alignment I knocked one up out of flat sheet of mdf and some bolts. The bolts allow the rim to be lifted to the centre line of the hub and by flipping the wheel over you can double check alignment.
It took a little longer than the instructions suggested but by following them I was able to build my first wheel with out too many troubles. Its just a case of take your time, don't rush ahead and start tensioning spokes too quickly like I did, and if things start to go wrong go take a timeout.
As far as I can tell the wheel has come out pretty well. I'll probably get one of the local bike shops to check it over before it gets used for real, but I think it should be OK.. in fact it’s in a hell of a lot better condition than all my other wheels!
All I need to do now is build the frame otherwise all I've got is an expensive wheel that doesn't fit anything.. useful!
Monday, 3 November 2008
Subscribe to:
Posts (Atom)